This meal will consist of three main recipes: Venezuelan Black Beans and Rice (self-explanitory), Carne Mechada, which is shredded beef in a tomato/pepper sauce, and Tequenos, which are dough-wrapped, deep-fried cheese bites.
When planning this meal, there are a few things to consider. First of all, the total cooking time for the carne mechada is 3.5 hours. 3 hours of that time is simply sitting in a pot, cooking, which can easily be done eaither sometime in the morning or around noon, since you can easily save the beef and the sauce it was cooked in in the fridge until the last 25 minutes before you serve.
For the tequinos, the dough can be made at any point in the day you want to. It might even be a good idea to roll the cheese in the dough and store in the fridge until you deep fry them, as rolling them up is a very time consuming process, and it really helps to have more free time just before you serve the meal.
Now comes the fun part. It's time to do some cooking.
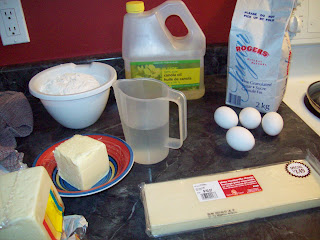
 To the left you can see all the ingredients used in preparing the beef for the carne mechada.
2 tbsp. canola oil
1.5 kg (3-4 lbs.) sirloin tip oven roast
2 garlic cloves, minced
2 onions, diced
2 bay leaves
salt and pepper to taste
1/3 cup dry red wine
2 cups water
The first step from the recipe is as follows:
1. Heat canola oil over medium heat in a large, heavy bottomed pot. Add sirloin roast and brown on all sides for five minutes.
The point of this step is simply to brown the outside of the beef before we throw the rest of the ingredients in. We are not cooking it all the way through yet. After 5 minutes, it should look something like this:
 Once it is browned nicely, add the garlic and onions to the pot, and stir them for 2 minutes until they're soft. Sprinkle the meat with some salt and pepper as well.
When the onions and garlic are sof
t, it's time to put the water, wine, and bay leafs in with the meat. Bring it to a boil after you've stirred it around, and the bring it back down to a low heat to simmer. Cover the pot, and let it cook for three hours, stirring often.
After three hours, take the meat out of the pot, let it drip, and then place it on a cutting board. Make sure you save the sauce that you cooked the beef in, this is an essential part of the recipe. When the sauce has cooled, you can put it in a container and save it in the fridge, or you can cover it back up and leave it in the pot.
The next step for the meat is to shred it up. The easiest way to do this would be to use a fork, dragging it along the meat so it tears away small chunks of the meat. Shred as much of it as you can, and then put it into a bowl to save for later.
Shredding the beef with a fork:

It should look something like this once the beef is completely shredded:

We can leave the beef alone for a little bit now. It's time to get the tequinos ready so they can be easily cooked later.
With this recipe, you have enough dough to make up to 70 or 80 tequinos, depending on how big your cheese slices are. If you don't have a large family, half of this recipe should be more than enough if you roll your dough nice and thin. Otherwise, you can always have extras another day. Tequinos are also quite filling, despite their small size, so make sure you leave some room for the main course!
 The tequino dough is relatively simple to make, and is made up of basic ingredients in any cook's kitchen. As follows, they are:
1 cup water
1/2 tsp. salt
1 tbsp. sugar
1/2 lb. butter
4 egg yolks (reserve whites for bean and rice dish)
4 cups flour
large amount (3 - 4 cups) canola or corn oil for deep frying
Start off by throwing the water, sugar, and salt into a bowl, and mixing it until it's dissolved. Add the butter and the egg yolks, and beat well until everything is nicely mixed. Then fold in the flour, and mix until it forms a ball. If the dough is too sticky, add a bit more flour until it doesn't stick to you when you touch it.
The dough should look like this once you've mixed all the ingredients together.
 You can let the dough sit for 25 minutes now, while you cut up the cheese.
The cheese should ideally be cut into 2 inch x 0.5 inch x 0.5 inch slices, however a little variation will not deduct anything from the quality of the tequinos. You can cut the cheese and wrap it at whatever time suits you, but it may be wise to do it a good while before you serve the food, as it is a very time consuming process.

Note: My cheese slices got very varied since the block wasn't the right size.
When it's time to roll the cheese slices in dough, there are two ways you can do it: the easy way, or the complicated way. The easy way is simply cutting strips of dough once you've rolled it out, and rolling the cheese slices in it, stretching the dough around the cheese and making sure there are no gaps in the dough where cheese could melt out during cooking.
The other, more complicated way looks more fancy, and makes the dough go a little bit further than it would otherwise. Here is a step-by-step method for it:
Start by cutting a strip of good length to wrap your cheese in. You'll learn how to judge the length after a few tries, but for now just make sure you have enough to wrap the cheese in. Place the dough on a flat surface, and then put the cheese on the dough like this:


Roll the dough around the cheese in a diagonal fashion like such:
 Depending on how long the slice of cheese is, continue wrapping the dough around the cheese until it reaches the top, and then close it off so that there are no cracks where the cheese can escape:
When you're about 45 minutes away from dinner, it's time to get the beef out again and start cooking the rice.
Start out by getting out your shredded beef and the sauce you cooked it in earlier. Start heating up the sauce on low heat. Meanwhile, in another pan, heat the oil on medium heat and then throw in the peppers to saute for 5-7 minutes. Once the broth is warm, put the peppers in, as well as the rest of the ingredients and the shredded beef. You can leave it on the burner on low heat until you're ready to serve.
For the Venezuelan Black Beans and Rice, you will need the following ingredients:
 4 cups basmati rice (or substitute your favorite rice and cook according to your own directions)
5 cups water
1 tbsp. butter
1 tsp. salt
1 onion, chopped
1 clove garlic
2 stalks celery, chopped
2 15 oz cans black beans, drained and rinsed
2 red peppers, chopped
2 tsp. turmeric
2 tsp. oregano
1 tsp. salt
It's a good idea to get the rice going first as it is relatively low-maintenance. As stated in the recipe, the first step is:
1. Cook rice: bring water to a boil in a large, heavy-bottomed pot. Add butter, salt and rice, stir thoroughly. Cover, turn down heat to low and let cook 18 - 20 minutes. Remove from heat, fluff rice, re-cover and let sit for five minutes.
While that's going on, you can carry out the second step in the recipe:
2. Meanwhile, heat canola oil in a large frying pan. Add onion, garlic, celery and peppers and fry 7 - 8 minutes, until soft. Add in black beans and spices. Heat, stirring frequently, for 5 - 10 minutes, until beans are hot through.
Your outcome will be a nice pan of beans:
 You can then throw the beans and rice together (once the rice is done cooking) and serve it when the rest of the meal is prepared.
The tequinos should be deep fried right at the end of the meal. Fill a small pot with oil, and put it at medium heat. Make sure it isn't too hot, however. After a while, test the oil by placing a small amount of tequino dough in. If it sizzles and cooks almost immediately, then the oil is ready. Place 5-6 tequinos into the pot, and let them cook for a minute, or until they are golden brown.

When they look done, take them out and put them onto a pan which has either paper towels or napkins on it, to drain. If you are not serving immediately, put them in the oven at a low heat so the cheese inside stays melted. It is suggested to serve them relatively quickly, as they are best hot.
Once everthing is ready, you can serve your dishes! If you're feeling fancy, you can serve the beans and rice with wedges of lemon. Tabasco sauce can help add a little more flavor to the rice as well.
Below are pictures featuring the three main dishes of this meal in their final stages:
 Black Beans and Rice:
Tequinos:

9 comments:
Looks delicious! I look forward to reading more.
Alice (from the WTM boards)
Fantastic! Great start! I'm adding you to my feed reader.
Janet (visiting from Halving it All)
Looks yummy.... A great homeschool project -- I bet your Mom is proud of you.
Great Job! The food looks delicious. I am going to try the Tequinos, they sound like the empanadas my grandma from Equador used to make. (she also sprinkled sugar on top when warm. Yummm!)
I love your blog -- lots of great details and pictures. I look forward to seeing your next menu.
Looks great! What kind of cheese did you use? Can you use any cheese? Also, how is the Carne Mechada served/eaten? Is it just ladled onto the plate, or does it go on the beans & rice?
Thanks everyone. :) And to 'ameliabedelia', the original tequino recipe called for "farmer's cheese," but since we could not find any up here we used mozzarella. Still works great!
The Carne Mechada can be eaten pretty much however you want it, but we've found that it is quite tasty on the rice and beans. We mixed the leftover rice and Carne Mechada, and if anything it was even better the next day.
Thanks again all. We've just made the Denmark meal, but I still need to get caught up on everything. Should be up this weekend.
"dough-wrapped, deep-fried cheese bites."
Who could ask for anything more!
After getting more than 10000 visitors/day to my website I thought your 192meals.blogspot.com website also need unstoppable flow of traffic...
Use this BRAND NEW software and get all the traffic for your website you will ever need ...
= = > > http://get-massive-autopilot-traffic.com
In testing phase it generated 867,981 visitors and $540,340.
Then another $86,299.13 in 90 days to be exact. That's $958.88 a
day!!
And all it took was 10 minutes to set up and run.
But how does it work??
You just configure the system, click the mouse button a few
times, activate the software, copy and paste a few links and
you're done!!
Click the link BELOW as you're about to witness a software that
could be a MAJOR turning point to your success.
= = > > http://get-massive-autopilot-traffic.com
Post a Comment